Welcome to my Blog

Welcome everyone, I hope to inspire you and share some of my papercraft work. You can find out where I teach and what I am up to, what inspires me and what I am working on next. I love to share new ideas and neat ways of adding creativity to your pages or cards etc

my blog

Saturday, June 21, 2014

Imaginarium WW1


Beautiful Smile WW1 layout 
and Decorated box 
by Sue Smyth 

This month I am sharing a cute little
 box I made for my desk and my White with one layout.


I found this sugary glittered B at a junk shop and bought it to work with one day. 
All of my children's names start with the letter B so I thought 
I had a good chance of it being useful. lol 


I have started with a chip filing box from office works, which
was black.
I have applied egg shell to the top, added lots of alcohol inks and
a coat or two of dimensional magic. 


Once dry I have added braid, Imaginarium chipboard and rhinestones strips
Spray with Dylusions ink and when dry rub over with gold paint.
For some detail I have added gold embossed corners 
and pearls.

Imaginarium Chipboard 


Beautiful Smile layout
White with one (Pomegranate)

This months challenge was the colour pomegranate which is one of 
my favourite colours, so I had no trouble whipping up a 
layout.
I have started with a plain sheet of Vanilla cardstock 
and covered areas with gesso and a stencil to 
add pattern.
Then sprayed with a combination of Pomegranate and Postbox Red 
Dylusions. Add a few flicks of black and white too.


I really wanted a heart with wings, but did not have one so 
substituted with the bracket frame and a resin heart. I liked 
the result.


The Moroccan screen behind the photo is simply embossed with gold
embossing powder.
I love the chipboard child on the side. I did not have the shape
I wanted left in the set, so used it as a mask and sprayed instead.
Then layered over the chip shape I did have which is painted
with gesso then sprayed with dylusions and had a final 
rub of fuchsia pearlex.


My hot tip with White with one layout is..
don't be afraid to use the "sister" colours  of the challenge
colour , in other words the neighboring colour on the colour wheel. 


Imaginarium Chipboard


Dont forget to leave a comment
to go in the running for a prize pack.

Happy Crafting 


Sunday, June 15, 2014

Couture Creations Bird Cage 2


Gilded Cage
By Sue Smyth 


This is the second little token I have made with the 
birdcage die, with very little in the way of materials.

The look I wanted this time is an antique gilded finish.
And while it is a great Birthday gift, I think these
would look awesome on a Christmas tree.

Of course the Couture Creations Birdcage die 
will make creating a whole lot of these much much easier!


Add a paper rose and some punched out leaves for a 
quick decoration on top of the cage.
This time I embossed the little bird with Red embossing
powder for a more festive look. 


Cut lightweight chipboard or recycled cereal boxes 
with Birdcage die. Emboss with
gold embossing powder. 
Emboss twice if you want a lush glossy look.

Dont forget to add a snippet of cardstock to the back
of the bird and adhere in place.
Then fill the wing with Gold Glitz in Glamour.

Add some decorative beads and gold twine to hang
the cage.


I have sprayed the back of the cage with 
black spray paint for a neat finish on the back
Add a tassel and more beads to the bottom of the cage.

Use your Couture Creations precision pointed tool to
apply gold rhinestones to the front of the cage.


Finish with a paper flower, chip word and greenery to 
complete your very own Gilded birdcage token.

Couture Creations Materials 

Happy Crafting 

Wednesday, June 11, 2014

Scrapbook and Papercraft Expo 2014


All the Pics from the Scrapbook and Papercraft Expo 2014

Thank you to all the ladies who stopped by and said hello, and especially those
who did my class, I hope you had a great time
and I was able to teach you a new trick or two!


My Tutor display
I have used 2 old window frames, and some scrapbooking techniques 
distressed them and sprayed them with Dylusions lol
then added a little shelf in each empty window pane.
this worked a treat to display many off the page items. 


Busy ladies ...Kelly-ann Oosterbeek one of Australian Scrapbook ideas
designers was getting busy with the glimmer mist.


Here Loren is spraying her altered flowers with a smile !


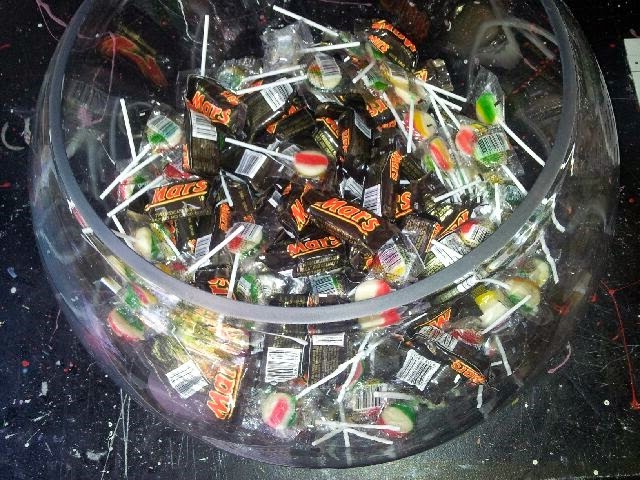
My big bowl of bribery, this was a great help at 3.30 when
everybody's energy levels were flagging! 


Dreadful photo of me talking and Kelly-ann Oosterbeek


The lovely Trina McClune who was in the class room next to me


Some close ups of my display


My poor chipboard picket fence kept falling down, until I used 3 D foam tape to 
hold it up. Thank god for scrapbooking supplies.


Me and my display!


Kerrie Gurney dressed as Maleficent in full flight 


Some happy scrappy campers!


Even Tinker bell stopped by to strike a pose. AKA Tracey Cooley


Dinner after the show, where we laughed and put up our feet 


Talking scrapbooking with Australian Scrapbook Ideas designers 


Sleeping Beauty has woken up! in the form of Tina Connolly 


Melissa Kennedy and I try a photo selfie!


Finally at the end of day 3 I put my feet up !!!

Monday, June 9, 2014

CSI 126 Megs Garden


U 2 LAUGH 
By Sue Smyth 


This is my first layout for CSI blog
using challenge 126.

The photo is of my oldest and youngest, they get on pretty well, so 
when I asked for some photos, they kept cracking each other up.
 I thought the colours would match this photo well.


I have used the new Correspondence collection as my base, layered in 
a paper doily and altered the flowers with spray inks.
These are not my usual colours, but it was good to go 
out of my comfort zone and use the colour story from CSI

Megs Garden materials 


Happy Crafting to all 


Saturday, June 7, 2014

Couture Creations Bird cage1

A little Birdy told me 
By Sue Smyth 


How elegant is the Couture Creations Glamour Days 
Birdcage die. I just could not resist making
a few clever little gift tokens from it.
I am sharing one of them today, but look out for 
another version later.


Nestled in side is a sweet little blue bird, 
sitting on a mossy nest, surrounded by flowers. 


Add some decorative beads and you 
have a gorgeous hanging token.


Die cut 2 birdcages from chipboard, paint white with gesso and 
allow to dry. Several coats will give good coverage. I have used
chipboard to give the token sturdiness. 


Coat with a Dimensional glue and sprinkle with glitter. 
This gives a good solid coat and will not warp the cardstock.


Use a hole punch to create a hole in the top of each cage.


Trim a small piece of chip to fit the bottom of the cage, score 
the sides and paint with gesso, allow to dry. Then adhere to cages as pictured.


Emboss the little bird with Blue embossing powder,
then trim a small piece of cardstock to fit over the winged area.


Glue white cardstock over wing area on reverse of bird.
then fill the wing with Silver Glitz in Glamour. 


Adhere bird to back of cage, and trim out the swing
on the front cage, so you can see the bird easily.
Add pearls, you may have to use extra
glue to make them adhere properly to the glittery
surface.


String some decorative beads on to silver twine 
and hang bird cage 


Finish with a cluster of moss, flowers and muslin.
Die cut leaves from green cardstock, with Aurora vine die
 and flowers with Retro flowers die  from purple cardstock.
 Tuck into cluster and add purple Glitz in Glamour to the tiny flowers.

Couture Creations Materials list 

Happy Crafting